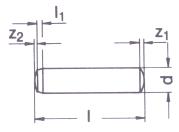
DIN
6325 |
 |
DIN
6325 |
 |
*All measurements in millimeters (mm)*
| d | l1 | z1 approx | z2 approx |
| M1.5 | 0.5 | 0.23 | 0.12 |
| M2 | 0.6 | 0.3 | 0.18 |
| M2.5 | 0.7 | 0.4 | 0.25 |
| M3 | 0.8 | 0.45 | 0.3 |
| M4 | 1 | 0.6 | 0.4 |
| M5 | 1.2 | 0.75 | 0.5 |
| M6 | 1.5 | 0.9 | 0.6 |
| M8 | 1.8 | 1.2 | 0.8 |
| M10 | 2 | 1.5 | 1 |
| M12 | 2.5 | 1.8 | 1.3 |
| M14 | 2.5 | 2 | 1.3 |
| M16 | 3 | 2.5 | 1.7 |
| M20 | 4 | 3 | 2 |
ISO-Tolerances for Metric Fasteners
|
Nomimal Dimension |
Tolerance Zone in mm (external measurements) |
||||||
| Over | To | h6 | h8 | m6 | |||
| 0 | 1 | 0 | -0.006 | 0 | -0.014 | +0.002 | +0.008 |
| 1 | 3 | 0 | -0.006 | 0 | -0.014 | +0.002 | +0.008 |
| 3 | 6 | 0 | -0.008 | 0 | -0.018 | +0.004 | +0.012 |
| 6 | 10 | 0 | -0.009 | 0 | -0.022 | +0.006 | +0.015 |
| 10 | 18 | 0 | -0.011 | 0 | -0.027 | +0.007 | +0.018 |
| 18 | 30 | 0 | -0.030 | 0 | -0.033 | +0.008 | +0.021 |
All information is strictly informative